前端开发系列之Webpack(四):常用高级特性

多个入口

接之前的例子,我们添加一个utils.js

let add = (a, b) => { return a + b; };

module.exports = add;   

然后修改 webpack.config.js 里的entry节点:

module.exports = {
    entry: ["./utils", "./app.js"],
    output: {
        filename: "bundle.js"
    }
}

随后,我们看一下生成的文件部分可以看到,我们可以有两个入口文件。

/***/ },
/* 1 */
/***/ function(module, exports) {

    "use strict";

    var add = function add(a, b) {
    return a + b;
    };

    module.exports = add;

/***/ },
/* 2 */
/***/ function(module, exports, __webpack_require__) {

    'use strict';

    __webpack_require__(3);

    var hello = __webpack_require__(8);

    document.querySelector('h2').textContent = hello("Jack");

/***/ },
/* 3 */

生成多个文件

entry: {
        utils:'./utils.js',
        main:'./main.js'
    },
    output: {
        path: './public/',
        filename: '[name].js'
    }   

这样会在 public目录下生成 utils.js 和 main.js

组织目录结构

之前的代码,整理一下目录

  1. 修改webpack.config.js

这里面解释几个部分

context: 就是切换当前目录,比如上面的例子,由于设置了context, 那么 ./utils.js 就是 ./js/utils.js

publicPath: 这个html里面引用js时要这样 /public/assets/js/main.js, 这个主要是为了给我们将来生产环境使用CDN用,虽然我们build到 build/js/main.js, 但我们html里面写/public/assets/js/main.js 依然能正常使用,是因为我们webpack-dev-server做了处理。

devServer:contentBase: 就是说开发的时候,我们的html页面从哪个目录提供。

1
2
3
4
5
6
7
8
9
10
11
12
13
14
15
16
17
18
19
20
21
22
23
24
25
26
27
28
29
30
31
32
33
34
35
36
37
38
39
40
41
42
43
44
45
46
47
48
49
50
51
52
53
54
55
var path=require('path');

module.exports = {
context: path.resolve('js'),
entry: {
utils:'./utils.js',
main:'./main.js'
},
output: {
path: path.resolve('build/js/'),
publicPath:'/public/assets/js/',
filename: '[name].js'
},
devServer: {
contentBase: 'views'
},
module: {
preLoaders: [
{
test: /\.js$/,
exclude: /node_modules/,
loader: 'jshint'
}
],

loaders: [
{
test: /\.js$/,
exclude: /node_modules/,
loader: 'babel',
query: {
presets: [
'es2015'
]
}
},
{
test: /\.less$/,
exclude: /node_modules/,
loader: 'style!css!less'
},
{
test: /\.(jpg|jpeg|png|gif)$/,
include: /images/,
loader: 'url'
}

]
},

jshint:{
"failOnHint": true,
'esnext': true,
}
};
  1. 调用webpack-dev-server 输出如下,仔细看里面的文字,就能理解上面所说。

    1
    2
    3
    4
    5
    6
    7
    8
    9
    10
    11
    12
    13
    14
    15
    16
    17
    18
    19
    20
    21
    jacks-MacBook-Air:webpack-demo jack$ webpack-dev-server
    http://localhost:8080/webpack-dev-server/
    webpack result is served from /public/assets/js/
    content is served from views
    Hash: 0dfbecb06bf342b05978
    Version: webpack 1.13.1
    Time: 2350ms
    Asset Size Chunks Chunk Names
    main.js 23.8 kB 0 [emitted] main
    utils.js 1.5 kB 1 [emitted] utils
    chunk {0} main.js (main) 21.9 kB [rendered]
    [0] ./js/main.js 138 bytes {0} [built]
    [1] ./css/main.less 1.02 kB {0} [built]
    [2] ./~/css-loader!./~/less-loader!./css/main.less 315 bytes {0} [built]
    [3] ./~/css-loader/lib/css-base.js 1.51 kB {0} [built]
    [4] ./images/me.jpeg 11.6 kB {0} [built]
    [5] ./~/style-loader/addStyles.js 7.15 kB {0} [built]
    [6] ./js/hello.js 155 bytes {0} [built]
    chunk {1} utils.js (utils) 87 bytes [rendered]
    [0] ./js/utils.js 87 bytes {1} [built]
    webpack: bundle is now VALID.
  2. 相关内容

index.html

1
2
3
4
5
6
7
8
9
10
11
12
<!doctype html>
<html>
<head>
<meta charset="utf-8">
<title>Webpack demo</title>
</head>
<body>
<div id="aboutMe"></div>
<h2></h2>
<script src="/public/assets/js/main.js"></script>
</body>
</html>

main.less

1
2
3
4
5
6
7
8
9
10
11
12
13
@nice-blue: #5B83AD;
@light-blue: @nice-blue + #111;

h2 {
background: @light-blue;
color: yellow;
}

#aboutMe {
width: 200px;
height: 200px;
background: url('../images/me.jpeg');
}

main.js

1
2
3
4
5
require('../css/main.less');

var hello=require("./hello.js");

document.querySelector('h2').textContent = hello("Jack");

ES6 module

webpack也可以使用es6的模块

hello.js

1
2
3
4
5
6
7
let hello=(name)=>{
return "Hello "+ name +", Welcome to Webpack, I am webpack dev server";
};

// module.exports=hello;

export {hello};

main.js

require('../css/main.less');

// var hello=require("./hello.js");

import {hello} from "./hello.js";

document.querySelector('h2').textContent = hello("Jack");

使用插件

之前我们的js里使用css的话,是把css内容插入到页面之中的,但是我们想提出单独的css文件,这个时候我们就需要使用plugin.

1
2
3
4
5
6
7
8
9
10
11
12
13
14
15
16
17
18
19
20
21
22
23
24
25
26
27
28
29
30
31
32
33
34
35
36
37
38
39
40
41
42
43
44
45
46
47
48
49
50
51
52
53
54
55
56
57
58
59
var path=require('path');
var ExtractTextPlugin = require("extract-text-webpack-plugin");
module.exports = {
context: path.resolve('js'),
entry: {
utils:'./utils.js',
main:'./main.js'
},
output: {
path: path.resolve('build/js/'),
publicPath:'/public/assets/js/',
filename: '[name].js'
},
devServer: {
contentBase: 'views'
},
module: {
preLoaders: [
{
test: /\.js$/,
exclude: /node_modules/,
loader: 'jshint'
}
],

loaders: [
{
test: /\.js$/,
exclude: /node_modules/,
loader: 'babel',
query: {
presets: [
'es2015'
]
}
},
{
test: /\.less$/,
exclude: /node_modules/,
loader: ExtractTextPlugin.extract("style-loader", "css-loader!less-loader")
},
{
test: /\.(jpg|jpeg|png|gif)$/,
include: /images/,
loader: 'url'
}

]
},

jshint:{
"failOnHint": true,
'esnext': true,
},

plugins: [
new ExtractTextPlugin("style.css", {allChunks: false})
]
};

目录下就是生成了单独的style.css 而不是插入到页面中, 我们需要在页面中使用style.css

1
<link rel="Stylesheet" type="text/css" href="/public/assets/js/style.css"/>    

前端开发系列之Webpack(三):Preloaders

Preloaders

Preloader就是在调用loader之前需要调用的loader, 他不做任何代码的转换,只是进行检查。

JSHint

我们比较常用的一个Preloader就是JSHint, 对我们JS代码进行检查.

接之前代码:

  1. 安装jshint-loader

    1
    npm install jshint jshint-loader --save-dev
  2. 修改 webpack.config.jshint

    1
    2
    3
    4
    5
    6
    7
    8
    9
    10
    11
    12
    13
    14
    15
    16
    17
    18
    19
    20
    21
    22
    23
    24
    25
    26
    27
    28
    29
    30
    31
    32
    33
    34
    35
    36
    37
    38
    module.exports = {
    entry: './main.js',
    output: {
    filename: 'bundle.js'
    },
    module: {
    preLoaders: [
    {
    test: /\.js$/,
    exclude: /node_modules/,
    loader: 'jshint'
    }
    ],

    loaders: [
    {
    test: /\.js$/,
    exclude: /node_modules/,
    loader: 'babel',
    query: {
    presets: [
    'es2015'
    ]
    }
    },
    {
    test: /\.less$/,
    exclude: /node_modules/,
    loader: 'style!css!less'
    },
    {
    test: /\.(jpg|jpeg|png|gif)$/,
    include: /images/,
    loader: 'url'
    }

    ],
    }

    };

  3. 指定JSHint使用es6.

    1
    2
    3
    4
    5
    6
    7
    8
    9
    10
    11
    module: {
    preLoaders: [
    ...
    ],
    loaders: [
    ...
    ]
    },
    jshint: {
    esversion: 6
    }
  4. 删掉hello.js里的一个;号,然后重启webpack-dev-server

1
2
3
4
5
6
7
8
9
10
WARNING in ./hello.js
jshint results in errors
'let' is available in ES6 (use 'esversion: 6') or Mozilla JS extensions (use moz). @ line 1 char 1
let hello=(name)=>{

'arrow function syntax (=>)' is only available in ES6 (use 'esversion: 6'). @ line 1 char 16
let hello=(name)=>{

Missing semicolon. @ line 3 char 2
}

前端开发系列之Webpack(二):Loaders

Loaders

Webpack最重要的特性就是Loaders,他的作用,就像Gulp或者Grunt里面的task, 它可以在生成文件之前对文件进行相应的转换。

ES6

ES6提供了很多优秀的新特性,在我的ES6+现在就用系列我写了10多篇介绍ES6的文章。

由于现在很多浏览器对ES6的支持还不太好,所以,我们需要使用转换器,webpack里就是loader来进行转换。

接上文的代码

  1. 我们先修改hello.js

    1
    2
    3
    4
    5
        let hello=(name)=>{
    return "Hello "+ name +", Welcome to Webpack, I am webpack dev server";
    };

    module.exports=hello;

由于Chrome已经支持了很多ES6的特性,所以我们打开Safari浏览器。

我们发现浏览器的console里输出

1
SyntaxError: Unexpected identifier 'hello'

说明,我们浏览器还不能支持let, 那么我们需要使用babel这个loader来进行转换,我们先把hello.js

  1. 安装babel loader

    1
    npm install babel-loader babel-core babel-preset-es2015 --save-dev
  2. 配置webpack使用babel-loader

    1
    2
    3
    4
    5
    6
    7
    8
    9
    10
    11
    12
    13
    14
    15
    16
    17
    18
    module.exports = {
    entry: './main.js',
    output: {
    filename: 'bundle.js'
    },
    module: {
    loaders: [
    {
    test: /\.js$/,
    exclude: /node_modules/,
    loader: 'babel',
    query: {
    presets: ['es2015']
    }
    }
    ],
    }
    };

    loaders是一个数组,是webpack使用的loader的集合,上面的意思就是 使用babel-loader处理所有以.js后缀的文件,但是忽略node_modules下的。 query参数是指babel使用的参数。

  3. 然后我们Ctrl+C结束webpack-dev-server,然后再输入webpack-dev-server重启,这个时候我们看到safari浏览器已经渲染正常了。

CSS

webpack也可以很好的管理我们的css依赖。

我们安装

1
npm install style-loader css-loader

css-loader是加载我们的css,style-loader把读取到的css内容全部插入到页面中。

我们创建一个main.css

1
2
3
4
h2 {
background: green;
color: yellow;
}

在之前的webpack.config.js的loaders数组里添加如下

1
2
3
4
5
{
test: /\.css$/,
exclude: /node_modules/,
loader: 'style!css'
}

webpack对一个文件可以使用多个loader,顺序是从右向左,中间用!分开,这个类似于gulp里的pipe, 不过语法也太wired了。

完整的配置如下:

1
2
3
4
5
6
7
8
9
10
11
12
13
14
15
16
17
18
19
20
21
22
23
24
25
module.exports={
entry: './main.js',
output: {
filename: 'bundle.js'
},
module: {
loaders: [
{
test: /\.js$/,
exclude: /node_modules/,
loader: 'babel',
query: {
presets: [
'es2015'
]
}
},
{
test: /\.css$/,
exclude: /node_modules/,
loader: 'style!css'
}
],
}
};

重启webpack-dev-server, 浏览器显示如下

less

现在很少有人使用css, 都会使用SASS, LESS之类的,那么我们把main.css改为main.less, 修改内容如下

1
2
3
4
5
6
7
@nice-blue: #5B83AD;
@light-blue: @nice-blue + #111;

h2 {
background: @light-blue;
color: yellow;
}

安装对应的loaders

1
npm install less less-loader --save-dev

修改main.js中 require(‘./main.css’)为require(‘./main.less’)

1
2
3
4
5
require('./main.less');

var hello=require("./hello.js");

document.querySelector('h2').textContent = hello("Jack");

修改webpack.config.js

1
2
3
4
5
6
7
8
9
10
11
12
13
14
15
16
17
18
19
20
21
22
23
24
25
module.exports={
entry: './main.js',
output: {
filename: 'bundle.js'
},
module: {
loaders: [
{
test: /\.js$/,
exclude: /node_modules/,
loader: 'babel',
query: {
presets: [
'es2015'
]
}
},
{
test: /\.less$/,
exclude: /node_modules/,
loader: 'style!css!less'
}
],
}
};

重启webpack-dev-server, 我们看到h2背景色已经变为#6c94be

url-loader

如果我们css里使用了url,或者js里require了一个image,那么我们就需要安装url-loader

1
npm install url-loader --save-dev 

修改main.less

1
2
3
4
5
6
7
8
9
10
11
12
13
@nice-blue: #5B83AD;
@light-blue: @nice-blue + #111;

h2 {
background: @light-blue;
color: yellow;
}

#aboutMe {
width: 200px;
height: 200px;
background: url('./images/me.jpeg');
}

修改index.html

1
2
3
4
5
6
7
8
9
10
11
12
<!doctype html>
<html>
<head>
<meta charset="utf-8">
<title>Webpack demo</title>
</head>
<body>
<div id="aboutMe"></div>
<h2></h2>
<script src="bundle.js"></script>
</body>
</html>

前端开发系列之Webpack(一):基本使用

在前端开发中使用构建技术已经是标配了,之前我已经写过了Gulp系列,在为什么需要前端构建我也已经讲了前端构建的必要性,相信不少人都使用过Grunt或者Gulp。

由于ReactJS, Angular2的火热,WebPack这个构建工具已经在社区中得到了广泛的认可,而Webpack已经成了React.js开发的标配,所以,我们有必要学习一下Webpack

Webpack 是什么?

官方网址:https://webpack.github.io/

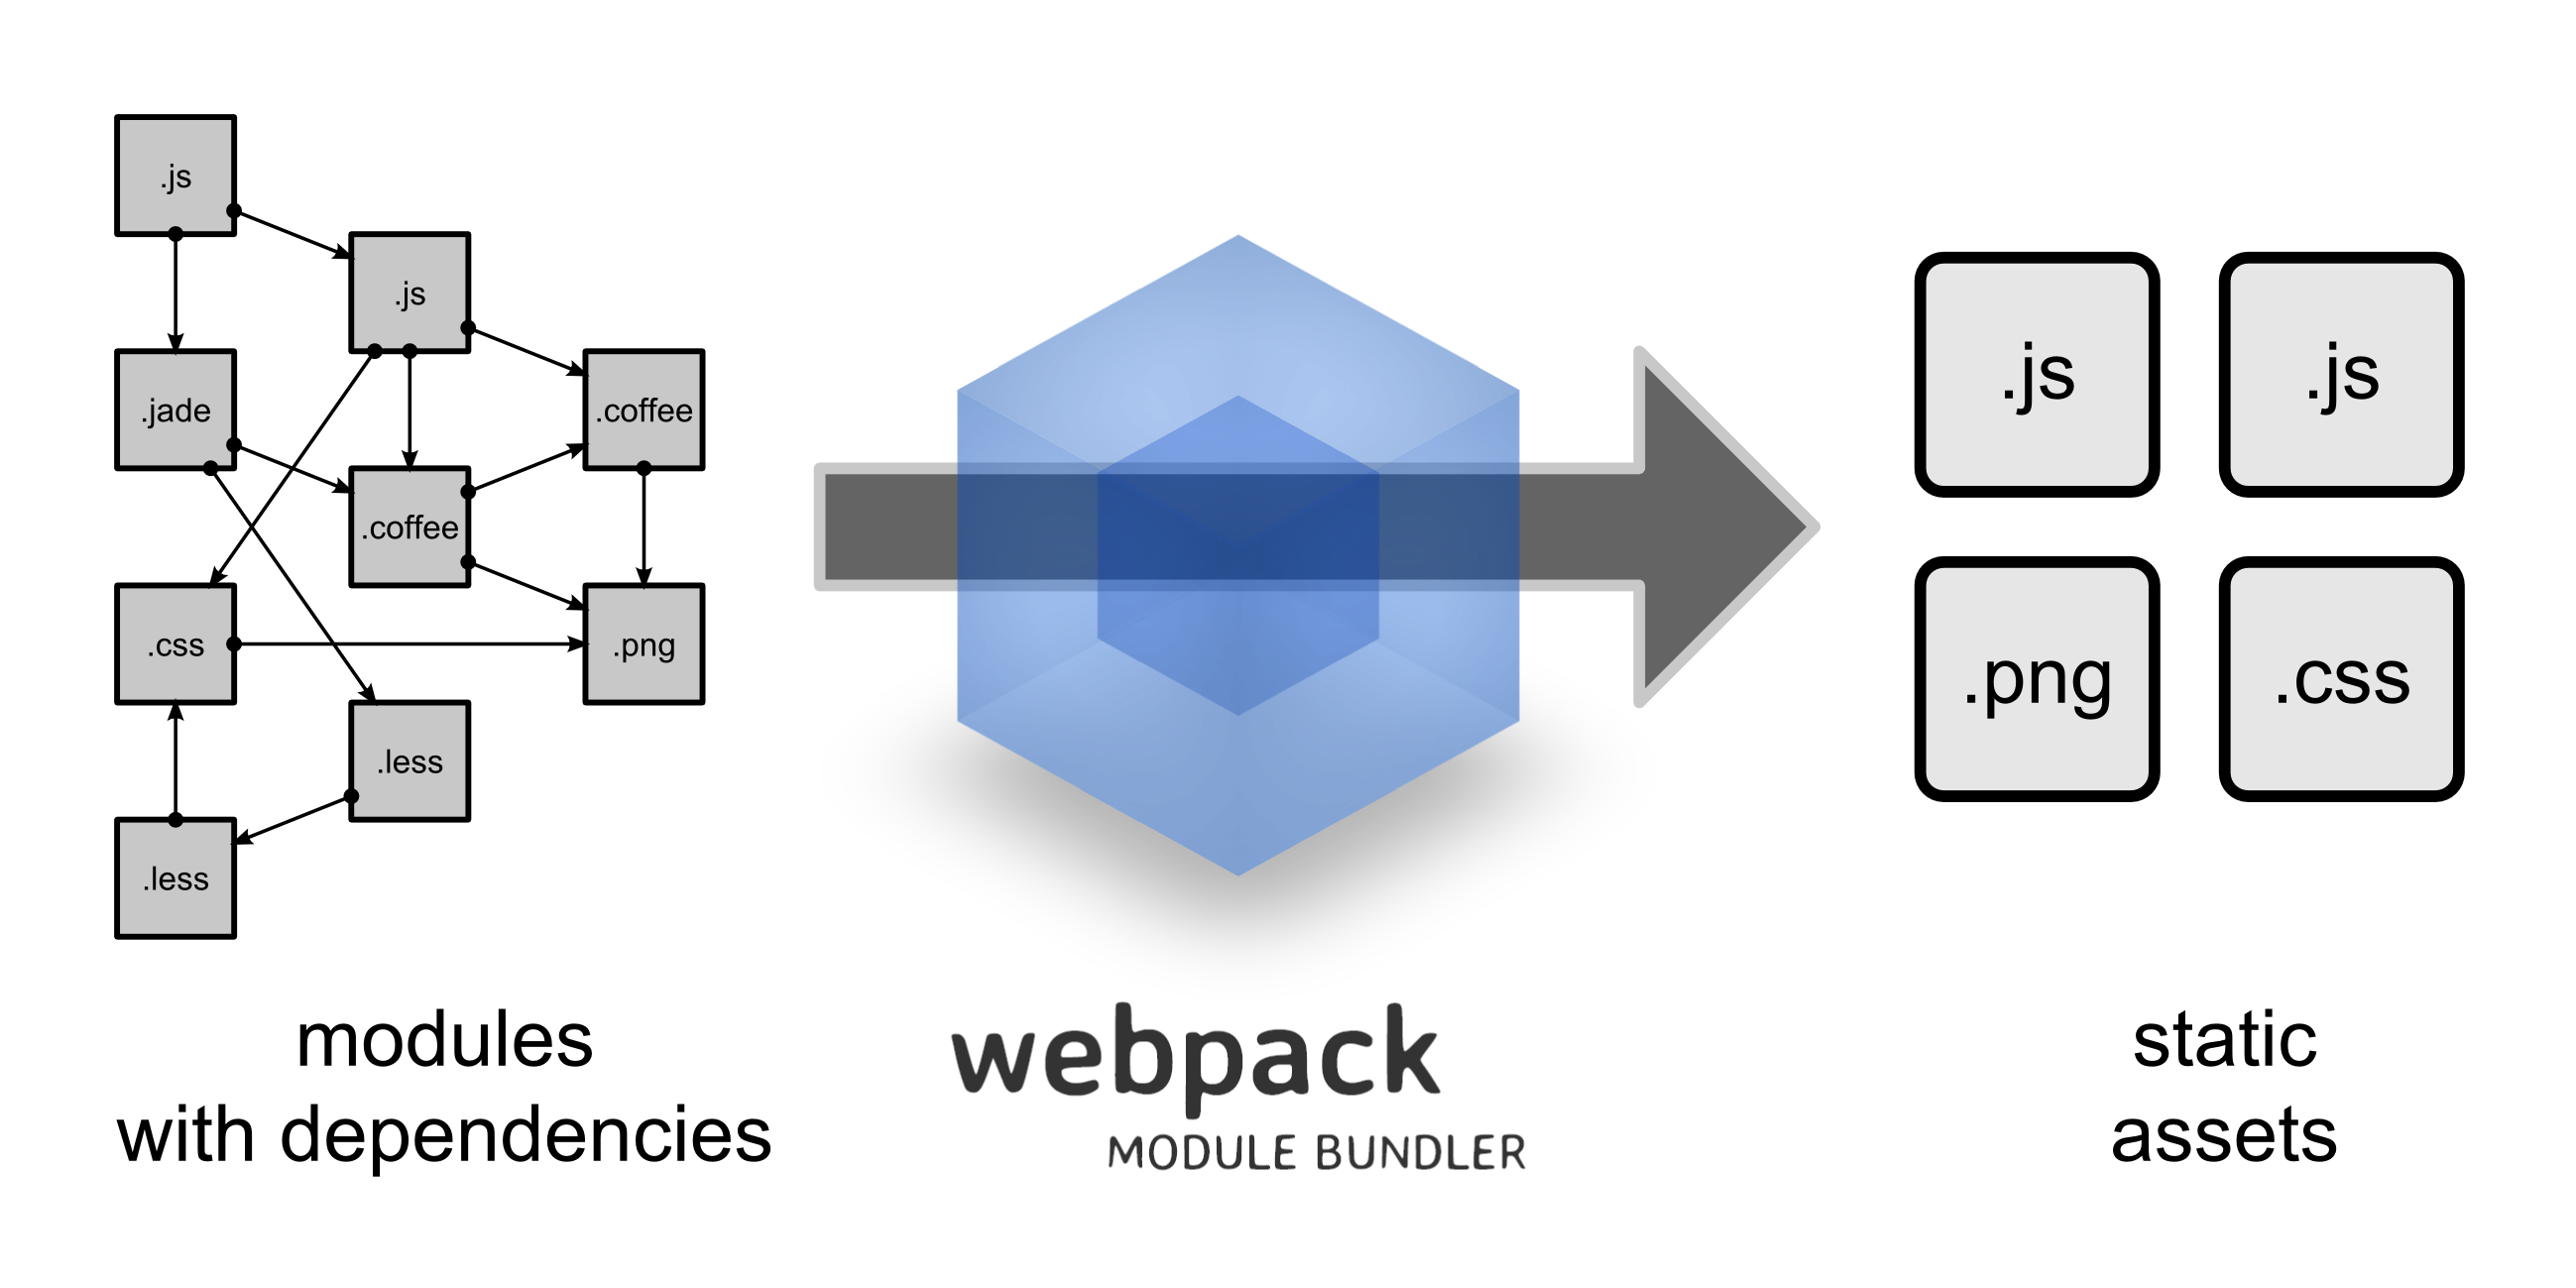
我觉得上面的图可以较好的解释webpack做什么,通常我们的前端需要使用模块化来组织代码,那么管理依赖就是比较头痛的一件事,而Webpack把所有的assets都当做一种模块,然后通过webpack输出为我们需要的文件。

Webpack 使用

安装和使用

  1. 安装webpack

    npm install webpack -g

  1. 新建一个目录 webpack-demo, 然后创建三个文件

index.html

1
2
3
4
5
6
7
8
9
10
11
<!doctype html>
<html>
<head>
<meta charset="utf-8">
<title>Webpack demo</title>
</head>
<body>
<h2></h2>
<script src="bundle.js"></script>
</body>
</html>

hello.js

1
2
3
4
5
function SayHello(name) {
return "Hello "+ name +", Welcome to Webpack";
}

module.exports=SayHello;

main.js

1
2
var hello=require("./hello.js");
document.querySelector('h2').textContent = hello("Jack");

然后,在终端执行

1
webpack main.js bundle.js

下面是终端的输出:

1
2
3
4
5
6
7
8
jacks-MacBook-Air:webpack-demo jack$ webpack main.js bundle.js
Hash: 43eaa05d6fc827ebad1f
Version: webpack 1.13.1
Time: 104ms
Asset Size Chunks Chunk Names
bundle.js 1.66 kB 0 [emitted] main
[0] ./main.js 91 bytes {0} [built]
[1] ./hello.js 104 bytes {0} [built]

然后,打开index.html,我们可以看到页面输出:

1
Hello Jack, Welcome to Webpack

配置

上面可以看到,我们只需要调用简单的一个命令,传入对应的参数,webpack就能给我们build出我们需要的bundle.js, 而且可以很好的处理依赖。但是如果我们每次都用命令行传入参数,那么就比较麻烦,webpack给我们提供了配置的方式

webpack默认的配置文件是webpack.config.js,所以我们就在根目录下创建一个webpack.config.js, 内容如下:

1
2
3
4
5
6
module.exports = {
entry: './main.js',
output: {
filename: 'bundle.js'
}
};

然后我们在控制台输入

1
webpack

打开页面我们看到之前一样的结果。

Webpack 开发服务器

现在,我们修改文件,就需要到命令行去敲webpack命令,并且刷新浏览器,而webpack-dev-server这个包为我们自动做了这些事,首先安装webpack-dev-server

npm install webpack-dev-server -g

然后,我们输入

1
webpack-dev-server

我们打开浏览器,输入 http://localhost:8080/webpack-dev-server/index.html

随后,我们修改hello.js为如下

1
2
3
4
5
function SayHello(name) {
return "Hello "+ name +", Welcome to Webpack, I am webpack dev server";
}

module.exports=SayHello;

我们看到页面自动刷新,内容也跟着变了